We often hear clients ask for the "strongest" geocell specifications, assuming that high tensile strength alone guarantees project success. However, in my experience visiting project sites across Southeast Asia and South America, I rarely see failures caused by the material breaking.
90% of geocell system failures—whether in road load support or slope protection—are caused by poor installation practices and a lack of quality control (QC).
Premature rutting, edge deformation, anchorage pull-out, and uneven settlement are not usually manufacturing defects; they are signs that the site crew skipped a step.
A structured quality control process ensures the long-term performance of geocell-reinforced systems. This guide provides a practical QC checklist for site engineers and contractors to ensure the installation matches the design intent.
Pre-Installation Quality Control
The most critical phase of quality control happens before the first section of geocell is even expanded. If the foundation is flawed, the cellular confinement system cannot perform its function.
1. Design & Specification Review
Before mobilizing the crew, the site engineer must verify that the materials and site conditions match the design assumptions. I have seen projects stall because the delivered cell depth was 100mm, but the aggregate size required 150mm.
Key Verification Points:
- Design Load: Confirm the traffic load or slope angle matches the specified geocell grade (e.g., textured vs. smooth, weld spacing).
- Infill Specification: Verify the aggregate gradation. Using material with too many fines can lead to drainage failure; using stones larger than the cell diameter prevents proper compaction.
- Subgrade CBR: Does the actual subgrade strength match the design notes? If the ground is softer than expected, a separation geotextile might be missing from the plan.
2. Subgrade Preparation Inspection
The geocell is a flexible mattress; it will conform to whatever is underneath it. Poor subgrade preparation compromises confinement performance regardless of geocell quality.
Subgrade Checklist:
- Compactage : Verify subgrade compaction meets the specification (typically ≥95% Standard Proctor).
- Surface Tolerance: Check for deviations. The surface should be smooth, with no deviations exceeding ±15–20 mm.
- Debris Removal: Ensure the surface is free of sharp roots, large rocks (>50mm), or debris that could puncture the separation geotextile or the bottom of the cell.
- Drainage: Confirm that the subgrade has the correct cross-slope to prevent water pooling under the system.
3. Material Inspection & On-Site Sampling
As a manufacturer, we insure our quality before shipping, but damage can occur during transit.
Upon delivery, conduct a random sampling (e.g., 1 panel per 500) to verify:
- Panel Dimensions: Expanded length and width.
- Weld Integrity: Manually check the ultrasonic welds. They should not peel.
- Sheet Thickness: Use a micrometer to verify the sheet thickness (typically 1.1mm to 1.6mm depending on texture).
- UV Log: Ensure pallets were not left uncovered in direct sunlight for months before installation.
Quality Control During Installation
This is where the "human factor" introduces the most risk. Many contractors treat geocells like simple plastic meshes, stretching them arbitrarily. This leads to weak zones and structural failure.
1. Panel Expansion & Alignment
The most common mistake I see is "over-stretching" or "under-stretching" the panels to fit a specific area.
QC Checklist:
- Uniform Expansion: Cells must be expanded to their design dimensions. If a cell is designed to be 250mm x 250mm, stretching it to 200mm x 300mm changes its structural properties.
- Alignement: Panels should be aligned with the direction of the slope or the road centerline.
- Connection: Verify that adjacent panels are connected using the correct pneumatic staplers or proprietary plastic keys. Zip ties are generally not recommended for heavy load-bearing structural connections as they become brittle.
- No "Twisting": Ensure there is no twisting at the panel joints, which creates a hinge point for failure.
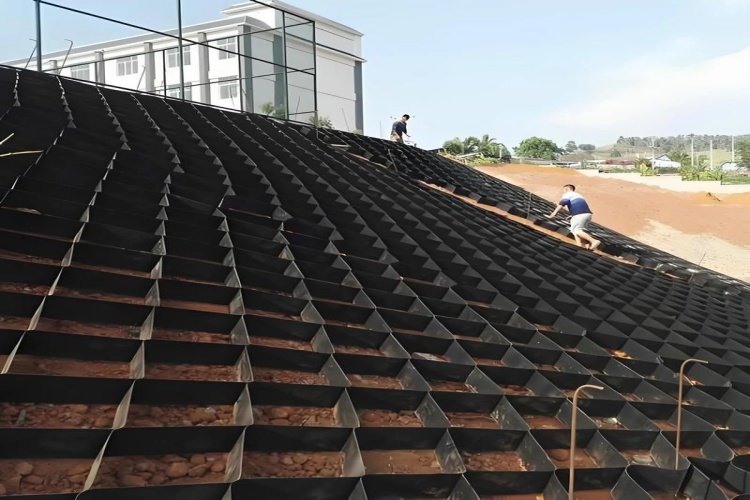
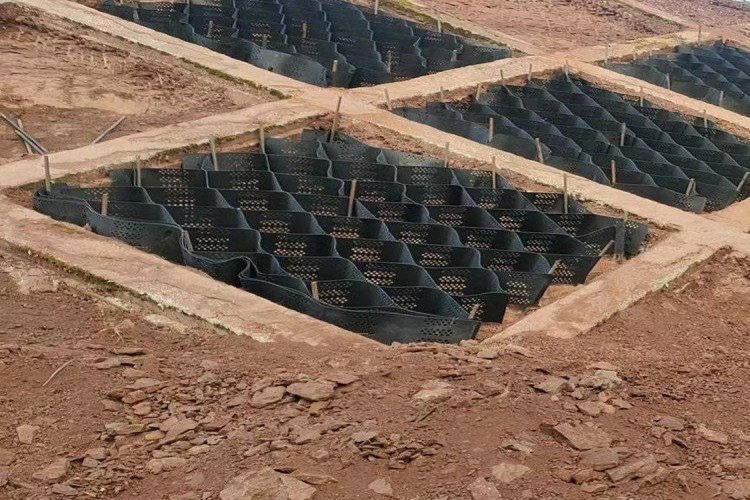
2. Anchoring System Verification (Critical for Slopes)
For slope protection, the anchoring system is the only thing fighting gravity. Anchorage failure is the number one cause of slope slides.
QC Checklist:
- Spacing: Measure the distance between J-hooks or tendons. Does it match the detailed drawing (e.g., every 3rd cell)?
- Anchor Integrity: Pull-test random anchors to ensure they are driven to the full design depth and have sufficient pull-out resistance.
- Crest Anchorage: The most stress occurs at the top of the slope. Ensure the anchor trench or deadman anchor system is installed exactly as specified.
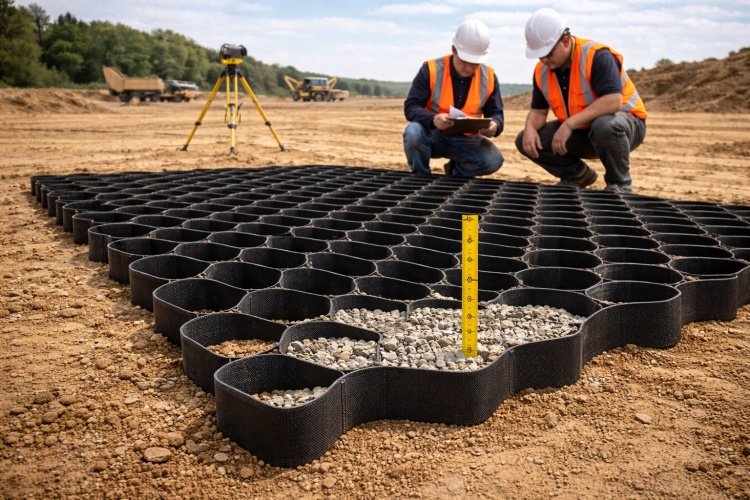
3. Infill Placement & Compaction Control
Infill quality directly determines confinement performance. The geocell wall provides the hoop strength, but the infill provides the compressive strength.
QC Checklist:
- Drop Height: Ensure excavators drop material from <1.0m to avoid crushing the cell walls.
- Filling Sequence: Fill from the top of the slope down, or from the center of the road out.
- No Heavy Equipment on Empty Cells: This is a mandatory rule. Trucks and loaders must only drive on filled, compacted cells. Driving on empty cells will crush the plastic.
- Overfill: Ensure the cells are overfilled by 25–50mm to allow for consolidation.
- Compaction Equipment: Use the correct equipment (vibratory plates for sand, sheep-foot rollers for clay). Do not over-compact to the point where cell walls buckle.
Post-Installation Verification
The job isn't done when the cells are full. A final verification protects the contractor from liability during the warranty period.
1. Surface Tolerance & Level Check
- Final Grade: Check the final elevation against the design.
- Coverage: Ensure no cell rims are exposed. Exposed plastic is vulnerable to UV degradation and physical damage from traffic or mowers.
- Edge Stability: Inspect the shoulders and edges. They should be buried and stable, not curling up.
2. Anchorage & Load Testing
- Visual Check: Walk the slope/road. Are there any visible bulges or slumping areas?
- Proof Rolling: For road projects, a fully loaded dump truck should drive over the finished surface. Measure the rut depth (deflection). If it exceeds the limit (e.g., >10mm), the compaction was insufficient.
3. Documentation & Reporting
Documentation protects contractors during project handover. A complete QC report should include:
- As-built drawings showing any deviation from the original plan.
- Photographic logs of the subgrade, anchoring pattern, and infill process.
- Signed QC checklists for each section.
- Material batch numbers for traceability.
Common Quality Control Failures to Avoid
Even with a plan, mistakes happen. These are the specific failures that seasoned inspectors look for:
- Skipping the Subgrade Check: Installing over soft mud and hoping the geocell fixes it (it won't; the whole system will sink).
- Improper Connection: Using insufficient staples or weak zip ties, leading to panel separation under load.
- "Lazy" Ancrage : Contractors increasing anchor spacing to save money/time, leading to slope failure during the first heavy rain.
- Wrong Infill: Using rounded river rock instead of angular crushed stone (angular stone locks together; rounded stone rolls).
- Visual-Only Inspection: Relying on how it "looks" rather than measuring compaction density or dimensions.
Conclusion:
Quality control in geocell installation is not about bureaucracy; it is about risk management. The material cost of a geocell project is significant, but the cost of remediation—digging up a failed road or re-building a collapsed slope—is three times higher.
Geocell performance equals system performance. The plastic, the anchors, the soil, and the subgrade must work as a unified composite structure.
When sourcing materials, look for manufacturers who provide more than just the plastic. Reliable suppliers support both material verification (lab testing) and technical verification (installation guidance).
For technical support, product testing data, or project-specific installation checklists, consult with our engineering team to ensure your project is built to last.