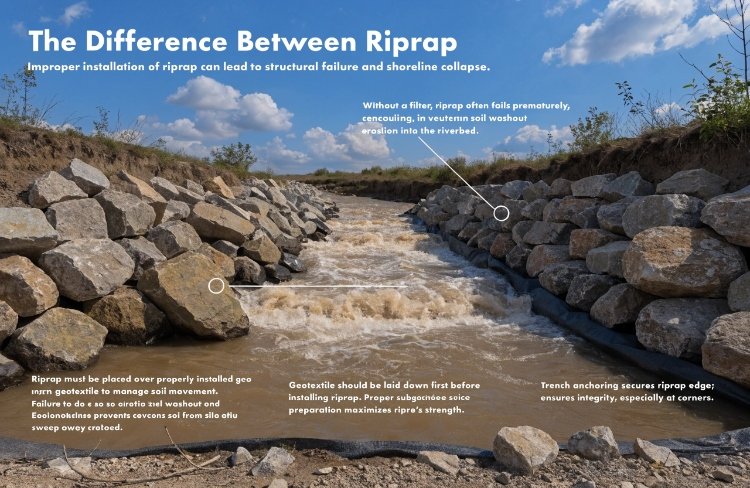
Dumping heavy armor stones directly onto an eroding riverbank will not stop land loss. Without a properly installed filter beneath, the water washes the soil away, and the costly rocks simply sink into the mud. Correct installation prevents this catastrophic failure.
This guide shows exactly how to install geotextile under riprap to prevent soil erosion and ensure structural stability. You will learn the correct practical methods for subgrade preparation, overlapping, trench anchoring, and safe rock placement to prevent expensive blowouts in your coastal and riverbank projects.
Over my years of exporting geosynthetics and troubleshooting site design failures, I have learned one brutal lesson: the best fabric in the world is useless if it is laid improperly. Here is how professional contractors install these materials to guarantee decades of protection.
1. Introduction: The Role of Installation in Riprap Performance
When buyers contact me for B2B procurement, many contractors focus entirely on sourcing massive armor stones, thinking brute weight alone will stop coastal or riverbank erosion. But dumping costly stones on an eroding bank is only half the job. In my field experience supplying overseas projects, the single biggest reason riprap fails is the lack of a properly installed filtration layer beneath the rocks.
The геотекстиль acts as a crucial barrier. When you skip this step or install it poorly, wave action and fast-moving river currents easily reach the bare soil underneath. The water washes the fine silt and sand directly through the large, empty gaps in your armor stones. This continuous soil loss creates deep, empty voids behind the wall. The slope destabilizes, and eventually, the heavy rocks sink into the mud or tumble directly into the water channel.
Proper installation is just as important as material selection. Even a premium grade, heavy-duty nonwoven geotextile will fail if it is laid incorrectly, inadequately overlapped, or damaged by an excavator during construction. Knowing how to install geotextile under riprap correctly protects your investment, ensures structural integrity, and prevents catastrophic slope washouts that can cost your clients tens of thousands of dollars to rebuild.
2. Typical Structure of a Riprap System
To understand why your installation technique matters, you first need to clearly understand the structural mechanics of a riprap system. Every stabilized bank, coastal wall, or shoreline consists of three distinct, interdependent layers working together. If any of these layers fail, the whole system collapses.
The foundation is the subgrade—the natural soil that forms the actual slope of the bank. This is the vulnerable layer we are trying to protect from the water's energy. The top layer is the riprap itself—the massive, interlocking rocks that absorb the brute kinetic energy of crashing waves and floodwaters.
But sitting right between these two is the most critical component: the geotextile filter fabric layer. Geotextile acts as a highly permeable filter and separator between the raw, soft soil and the heavy, jagged rock. Without it, the rocks sink deep into the muddy subgrade under their own massive weight, while the soil simply washes out through the rock voids. The entire installation process I outline below is focused on securing this middle layer so that it maintains continuous, unbroken contact with the subgrade while surviving the crushing weight of the armor stones placed on top.
3. Pre-Installation Preparation
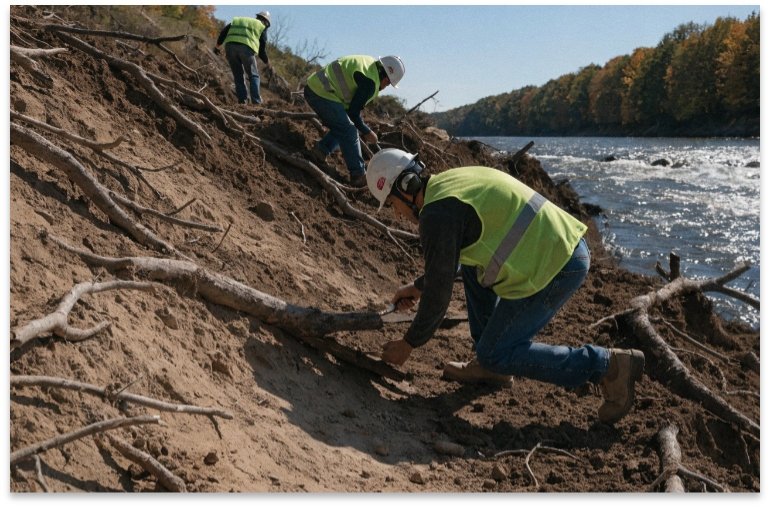
Before a single roll of fabric touches the dirt, rigorous site preparation is absolutely mandatory. I constantly tell my export clients and site managers: a poorly prepared subgrade is one of the main causes of concealed geotextile damage. If you do not prep the ground, your project will fail before the rocks even arrive.
Подготовка земляного полотна
You must clear the slope entirely from top to bottom. Remove all tree roots, sharp stumps, large jagged rocks, and stray construction debris. For example, if you leave a jagged tree root protruding near the waterline, the massive weight of the rocks above will force the root directly through the fabric. Once the fabric is pierced, water rushes into the hole, pulling the soil out. Fill in any deep holes and grade the soil to a smooth, flat surface. Finally, compact the soil so the fabric rests evenly without stretching over empty gaps.
Material Selection Check
Check your inventory to ensure you actually have the right material on site. For riprap applications, a heavy nonwoven geotextile is almost always prioritized over a woven fabric due to its superior filtration capacity, high flow rates, and excellent puncture resistance. We typically recommend using 300–500 gsm materials for standard bank protection, adjusting for the size of the stone.
Site Conditions Assessment
Evaluate the live flow conditions immediately before work begins. Look at the water flow velocity, the angle of the slope, and the natural soil type. Steeper river slopes and faster currents will directly dictate deeper anchor trenches and significantly wider fabric overlaps to keep the system intact during the actual installation phase.
4. Step-by-Step Installation Process
This is the core phase of the project where precision matters. Overlooking any of these sequential steps severely compromises the entire erosion control structure.
Step 1: Subgrade Final Grading
Run a final visual check alongside your site foreman. The freshly graded slope must be completely flat, structurally solid, and free of hidden voids. If the fabric bridges over an unseen hole, the sudden weight of a dropped rock will stretch out the polymer fibers and puncture the fabric instantly, ruining its filtration capacity.
Step 2: Laying the Geotextile
Always lay the geotextile rolls strategically. For steep riverbanks, start from the top crest of the slope and unroll downward toward the toe of the water. The fabric should lay loosely, naturally conforming to the contours of the earth. Never pull it stretch or drum-tight. The fabric must retain slack to absorb the physical impact of the rocks settling without tearing under tension.
Step 3: Overlapping
This step prevents massive soil leaks. Never seamlessly butt the edges of the fabric together. You must overlap adjacent panels by a strict minimum of 30 to 50 cm. If your site experiences high flow velocities, heavy tidal pull, or if the installation is happening entirely underwater, you must increase the overlap to 1 meter or mechanically sew the seams. Always place the upstream panel over the downstream panel so the moving water naturally flows over the seam, not directly into it.
Step 4: Anchoring
You cannot simply lay the fabric on the ground and expect it to stay. At the very top of the slope, excavate an anchor trench roughly 30 to 50 cm deep and 30 cm wide. Drop the top leading edge of the geotextile down into the trench and backfill it tightly with compacted soil. This anchors the top, preventing the massive sheet of fabric from dragging down into the river under the weight of the rocks.
Step 5: Riprap Placement
Start placing your armor stones at the toe (bottom) of the slope and systematically work your way up to the crest. Never drop massive stones from a high excavator bucket. Carefully place the riprap from a maximum drop height of 30 cm to prevent tearing the fabric. Spread the rocks evenly to interlock the system across the entire slope.
5. Key Technical Considerations
As a manufacturer and solution supplier, I engineer material recommendations based on specific site loads. It is crucial to understand how technical parameters dictate your installation methods. Every action your crew takes on the job site must align with the mechanical limits of the geosynthetics.
First, evaluate puncture resistance compared to your stone size. The sheer size of your armor rocks dictates the fabric's required strength. Heavier geotextiles (such as 500+ gsm) are absolutely required when massive, angular riprap stones are used. This prevents puncture damage during placement, as even the most careful excavator operator will occasionally drop a stone too hard.
Second, balance your overlap width against the water flow velocity. Here is a practical outline:
| Site Condition | Minimum Overlap | Practical Notes |
|---|---|---|
| Dry / Flat ponds | 30 cm | Standard application |
| Moderate streams | 50–60 cm | Accounts for minor shifting during rock placement |
| Coastal / Tidal | 100 cm or Sewn | Mandatory to resist high wave suction forces |
Finally, balance fabric weight against physical loads. While heavier materials offer far better protection against impact, they are naturally stiffer and harder to mold to uneven subgrades. Your installation crew must spend extra time ensuring extremely thick fabrics are pushed down firmly into the contours of the soil by hand before the rocks lock them in place.
6. Common Installation Mistakes and Project Limitations
Even if you procure the best nonwoven geotextile for erosion control on the market, bad site practices will ruin the investment. I have inspected countless failed sites, and the blowouts usually stem from a few recurring, entirely avoidable errors.
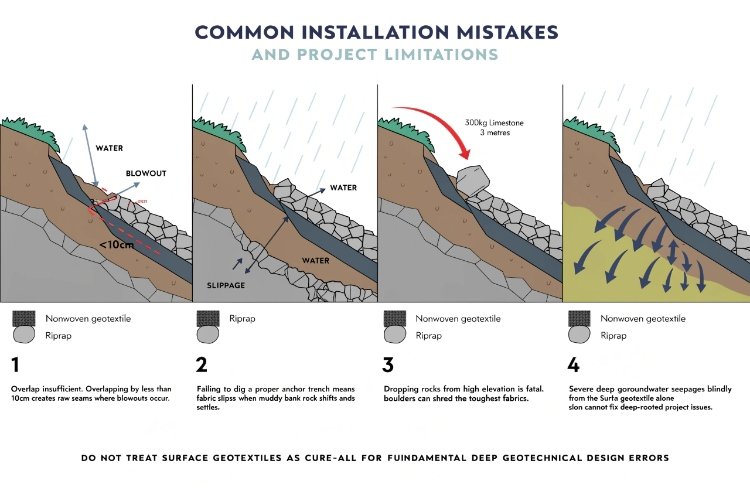
First, insufficient overlap is the most common mistake. Contractors try to save a little money by reducing the necessary overlap to a mere 10 cm. When the heavy rock shifts and settles, the fabric pulls apart, creating raw seams where an erosion blowout occurs rapidly.
Second, failing to dig a proper anchor trench means the entire fabric sheet will slip down the muddy bank the exact moment the first heavy load of rock hits it. You cannot rely on ground friction alone to hold it on an incline.
Third, dropping rocks from high elevations will shred any material. Geotextiles are extremely tough, but they are not made of solid steel. A 300kg angular limestone block dropped from three meters up will slice right through an expensive heavy-duty fabric.
Most importantly, you must recognize the severe limitations of the system itself. Geotextile under riprap is not designed to fix deep-seated geotechnical instability. If your slope has severe groundwater seepage pushing blindly from the inside out, or if you are dealing with deep rotational embankment failures, a surface geotextile will not save it. You may require deep drainage pipes or soil stabilization grids before laying any fabric. Do not treat surface geotextiles as a cure-all for fundamental, deep geotechnical design errors.
7. Field Tips for Better Performance
Beyond the basic installation manual steps, experienced site managers use a few pragmatic rules of thumb to guarantee long-term performance. These are the actionable, field-tested strategies I share with my commercial buyers during their project planning phase.
Cover the geotextile as quickly as possible. Synthetic polymer rolls are highly vulnerable to ultraviolet (UV) degradation. Never unroll a massive section of shoreline fabric and leave it completely exposed to the hot sun for two weeks while waiting for the rock quarry to deliver the materials. Sunlight breaks down polymer chains rapidly, rendering the fabric exceptionally brittle. Ideally, you must cover the newly laid fabric with riprap the exact same day you lay it down.
Carefully control your heavy equipment operation. Never allow tracked excavators or heavy bulldozers to drive directly on top of the exposed fabric. The metal steel tracks will rip the material to shreds horizontally in seconds. All heavy machinery must operate strictly from the established dirt subgrade, or carefully maneuver over sections that already have a heavily compacted, protective layer of rock firmly placed.
Lastly, always inspect the fabric visually immediately before dropping the stones. If you spot an accidental tear caused by a worker's heavy work boot or a dropped steel tool, do not sweep it under the rug. Cut a clean patch of scrap geotextile, ensure it overlaps the hole visibly by at least 60 cm on all sides, and lay it securely over the tear before rock placement begins.
8. Need Help with Your Riprap Project?
Selecting the right material and correctly calculating your overlaps can literally make or break your expensive shoreline defense. At Waterproof Specialist, we are a true factory-direct manufacturer and full solution provider. We supply high-performance геосинтетические материалы engineered explicitly for demanding B2B projects across the globe.
If you are currently planning an erosion control or shoreline defense project, we provide professional material selection support based on your exact flow rates, bank soil types, and engineered stone sizes. Rather than guessing which roll you might need, we ensure your engineering specifications match our heavy-duty nonwoven fabrics perfectly so you don't overspend or underbuild.
We also offer customized roll sizes up to 6 meters in width. Using wider, factory-direct rolls dramatically reduces the number of highly vulnerable overlap seams your crew has to manage on site. This saves you profound labor costs and lowers the long-term risk of a seam failure. From lightweight drainage filtering fabrics to extreme 800+ gsm marine rock armor filters, we handle the production, rigorous QA testing, and efficient container loading. Reach out to our team today for dedicated technical support, specification recommendations, and a rapid quotation for your next critical infrastructure project.

Заключение
Proper installation guarantees your chosen riprap structure will remain structurally stable for decades against harsh hydraulic forces. By actively preparing the bare subgrade, overlapping panels correctly, adequately securing the top anchor trench, and carefully placing the massive armor stones, you drastically protect your geotextile from destructive hidden damage. Follow these site protocols meticulously to entirely prevent subgrade soil erosion and ensure a resilient, long-lasting shoreline defense for your clients.